Product Photography Tips for Beginners: How to Shoot Products That Sell (Even with a Phone)
Here's a truth that most new sellers learn the hard way: your product could be incredible, but if the photos look bad, people scroll right past it. Product photography is the first impression your customer gets, and it happens in about two seconds. No pressure, right?
The good news is that you don't need a professional studio, a $3,000 camera, or years of experience to take product photos that actually convert. A phone, some natural light, and a few smart techniques will get you surprisingly far. This guide covers all the product photography tips for beginners that I wish someone had laid out for me when I started selling online.
Let's get into it.
Lighting: The Single Biggest Factor in Product Photography
If you only take one thing away from this article, make it this: lighting matters more than your camera. A phone photo taken in good light will always beat a DSLR photo taken in bad light. Always.
Use Natural Light Near a Window
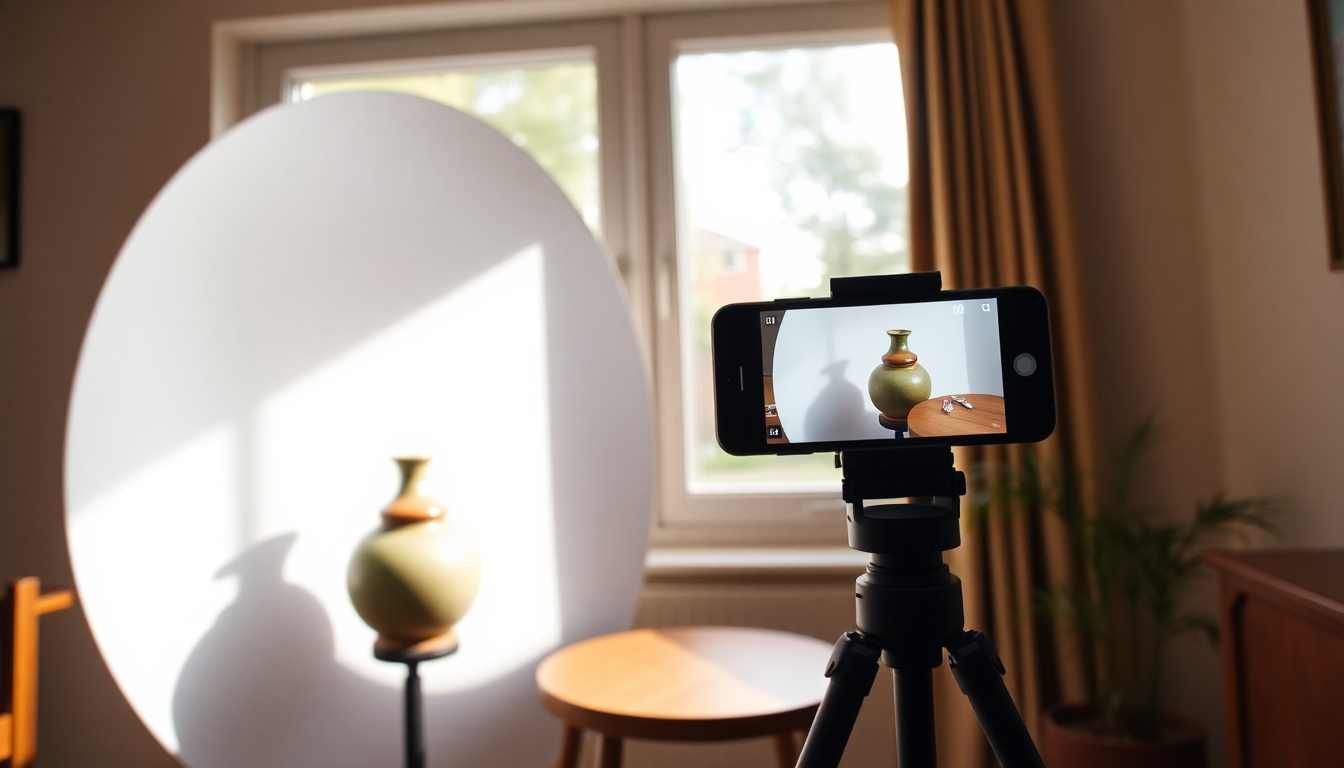
The easiest and cheapest lighting setup for beginners is a window. Set up a table next to a large window that gets indirect sunlight. You want bright, even light without harsh sun rays hitting your product directly. North-facing windows are perfect for this, or any window on an overcast day.
Position your product so the light comes from the side or slightly in front. Side lighting creates gentle shadows that give your product depth and dimension, which is exactly what you want.
Make a DIY Diffuser
If direct sunlight is hitting your window, don't give up on the spot. Tape a sheet of white tissue paper, parchment paper, or a thin white curtain over the window. This diffuses the light, softening harsh shadows and creating that smooth, professional look. It costs almost nothing and makes a huge difference.
Skip the Flash
Your phone's built-in flash is not your friend for product photography. It creates flat, washed-out images with harsh shadows behind the product. Just turn it off. If you need more light, add a second light source (like a desk lamp with a white bulb) on the opposite side from your window to fill in shadows.
Camera and Phone Settings That Make a Difference
You really can take great product photos with a phone. Most modern smartphones have cameras that rival entry-level DSLRs in the right conditions. Here's how to photograph products with the phone already in your pocket.
Shoot at the Highest Resolution
Go into your camera settings and make sure you're shooting at the maximum resolution available. For iPhones, shoot in HEIF or ProRAW if your model supports it. For Android, look for a "high resolution" or "full" setting. You want as many pixels as possible so you have room to crop later without losing quality.
Use Portrait Mode Carefully
Portrait mode can give your product photos a nice blurred background (bokeh) that looks professional. It works well for single products that you want to stand out. But watch the edges of your product carefully. The software blur sometimes gets confused and eats into the product outline, especially with complex shapes. Review your shots zoomed in before you move on.
Lock Your Focus and Exposure
On most phones, you can tap and hold on your product to lock the focus and exposure. This prevents the camera from refocusing or adjusting brightness between shots, which keeps your images consistent. Consistency matters a lot when you're shooting multiple products for a store.
Use a Tripod or Stable Surface
Camera shake is a silent killer of product photos. A cheap phone tripod (you can find them for under $15) will sharpen up your images instantly. No tripod? Stack some books and lean your phone against something stable. Anything is better than trying to hold it steady by hand.
Choosing the Right Backdrop
Your background can make or break a product photo. Cluttered or distracting backgrounds pull attention away from what you're actually selling.
The White Sweep
The classic product photography background is a white sweep. Take a large piece of white poster board and curve it from the table surface up against a wall. This creates a seamless background with no visible line where the table meets the wall. It's clean, professional, and works for almost everything.
Other Backdrop Options
White isn't your only option. A piece of marble-patterned contact paper looks great for jewelry or beauty products. Black foam board adds drama for tech products. Linen or cotton fabric gives a warm, handmade feel for artisan goods. Just keep it simple and make sure the backdrop complements your product rather than competing with it.
And here's something worth knowing: even if your backdrop isn't perfect, you can fix it later. Tools like Pixelus let you remove backgrounds completely and either replace them with clean white or generate entirely new scenes around your product. So don't stress too much about getting the background absolutely perfect in-camera.

Composition: Arrange Your Shots Like a Pro
The Rule of Thirds
Turn on the grid overlay in your camera app (most phones have this option in settings). Place your product along one of the grid lines or at an intersection point rather than dead center. This creates a more dynamic, visually appealing image. It's one of those simple product photography tips that immediately makes your work look more polished.
Shoot Multiple Angles
One photo per product isn't enough. Shoppers want to see what they're buying from every angle. For most products, plan on shooting:
- A straight-on front view
- A 45-degree angle shot
- A top-down or flat-lay view
- Close-up detail shots (texture, labels, features)
- A scale shot showing size context
Different marketplaces have specific image requirements for product listings, so check the guidelines for wherever you're selling. Amazon, Etsy, and Shopify all have slightly different rules about image sizes, backgrounds, and what's allowed in your main photo.
Leave Room for Cropping
Don't zoom in too tight on your product. Leave some breathing room around the edges. You can always crop in tighter later, but you can't add pixels that aren't there. This also gives you flexibility to adjust framing for different aspect ratios across platforms.
Common Mistakes That Beginners Make
When you're learning product photography for beginners, these are the pitfalls that trip most people up.
- Cluttered backgrounds. That kitchen counter with dishes in the background? Your customer notices. Keep the scene clean and intentional.
- Harsh shadows. If your product is casting a dark, sharp-edged shadow, your light source is too direct. Diffuse it or move it further away.
- Wrong white balance. If your white background looks yellow or blue, your white balance is off. Most phone cameras handle this automatically, but if things look weird, try tapping on the white area of your backdrop so the camera can adjust.
- Inconsistent style. If you're selling multiple products, keep the lighting, angles, and backgrounds consistent across your whole catalog. A cohesive look builds trust.
- Skipping the edit. Even small adjustments to brightness, contrast, and sharpness can transform a decent photo into a great one. Never upload a photo straight from the camera without at least a quick edit pass.
Editing Basics: Polish Before You Publish
You don't need Photoshop to edit product photos. Free apps like Snapseed or Lightroom Mobile are more than enough to get started. Focus on these adjustments:
- Brightness and exposure: Make sure your product is well-lit and easy to see.
- Contrast: A small boost in contrast helps your product pop against the background.
- White balance: Correct any color casts so whites look white and colors look accurate.
- Sharpness: A subtle sharpness increase helps, especially for phone photos. Don't overdo it, though, or textures start looking crunchy.
- Crop and straighten: Make sure your product is aligned and the composition is balanced.
These five adjustments take about 30 seconds per photo and make a noticeable difference in the final result.
How AI Takes Your Phone Photos Further
Here's where things get really interesting for beginners. The gap between a phone photo and a professional studio shot used to be enormous. AI has closed that gap dramatically.
Let's say you've followed all the tips above and taken a solid product photo on your phone with good lighting and a clean background. That's a great starting point. But with AI tools, you can push it much further without needing any design skills.
Background removal is probably the most useful feature. Instead of spending 20 minutes carefully cutting out your product in a photo editor, tools like Pixelus can remove the background in seconds. The result is a clean, isolated product on a transparent or white background, which is exactly what marketplaces like Amazon require for main listing images.
Scene generation is where things get creative. Once your product is isolated, you can place it into AI-generated lifestyle scenes. Need your candle photographed on a cozy marble shelf with warm lighting? Or your sneakers on a rain-slicked city street? You can generate these scenes without booking a location, hiring a photographer, or building a set. It's a game-changer for sellers who want lifestyle shots but don't have the budget for a full production. You can read more about how this works in our guide to AI product photography in 2026.
Upscaling is another quiet superpower. If your phone photo came out a bit small or you need to crop in tight on a detail, AI upscaling can increase the resolution while keeping the image sharp and natural-looking. This is especially handy when a marketplace requires large image dimensions and your original file doesn't quite meet the spec.
The point isn't that AI replaces good photography fundamentals. It doesn't. You still want to start with the best photo you can take. But AI tools extend what's possible with a basic setup, and they let solo sellers and small teams compete with brands that have dedicated photo studios.
Ready to turn your product photos into professional listing images?
Pixelus helps you remove backgrounds, generate lifestyle scenes, and upscale your photos, all from a single platform.
Try Pixelus FreePutting It All Together
Learning how to photograph products well doesn't require fancy gear or a big budget. It requires attention to a few fundamentals: good lighting, a clean background, steady shots, and a bit of editing polish. If you nail those basics with your phone, you'll already be ahead of most sellers who rush through their product photos.
And when you're ready to go further, AI tools can help you bridge the gap between "good enough" and "looks like it came from a professional studio," without adding hours of work to your process.
Start with one product. Set up next to a window. Shoot it from five angles. Edit the best ones. You'll be surprised how good the results look. Then keep practicing, keep refining, and keep shooting. That's how every good product photographer started.